With help from Sug and my son I have started to build a bed nook on the upstairs landing at the shore house.

The landing area is 114″ long on the window wall and 106.5″ wide.
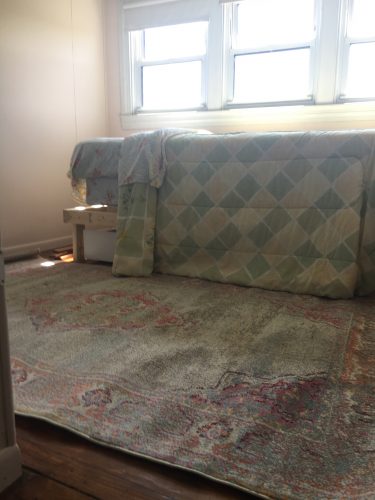
In the third installment we built Ikea under-bed drawers and a bed frame from 2 by 4s.

Drawers and frame.
This past Saturday we added a shelf and headboard at each end of the bed.

Basic support is tied into the wall about 2 inches under the window.
The plywood is supported with 2 by 4s screwed into the wall.

The shelf will be useful to hold books, a lamp, a glass of water, etc.

The shelf and headboard are 1/4″ plywood.
A second piece of plywood was positioned at right angles to the shelf and cut out at the bottom to rest on the bed frame. Small blocks of 2 by 4 secured the pieces of plywood at the corner. Both sides were accomplished with one 4 by 8 sheet of plywood.

We also tried to install the front surround but ran into problems with a sloped floor.
The plan was to encase the entire project in a frame made of MDF. We got started on it but ran out of steam when the measurements didn’t work out exactly. So we will make another trip to finish the construction portion of the project.

Shutters will eliminate the need for curtains at the windows.
I also tried an old shutter at the window for size. I think it will work well but needs first to be painted.
The supply list:
- 2 by 4s
- 2 – 4 by 8 sheets 1/2″
plywoodMDF - 1 – 4 by 8 sheet 1/4″ plywood
- Long brads for pneumatic nailer
- Pocket screws for Kreg jig
Here’s the original plan with the finished items highlighted in pink font:
- Choose a paint color for the ceiling and walls. The trim will be Simply White semi-gloss to match the rest of the house.
- Wash the windows and clean shades. Measure to see if shutters would work.
- Buy paint and prime and paint ceiling and walls.

Painting the room made it appear bigger and brighter.
- Measure the room.
- Draw a plan for the bedframe and nook frame.
- Purchase and assemble under bed drawer from Ikea.
- Purchase lumber for the project.
- Build the frame and facing. Remember to move the electric outlet.
- Paint the facing and visible frame.
- Make the bed with fresh linens.
- Hang art inside the nook.
- Add a lamp to the nook — wall sconce or small brass lamp.
The next step is to finish the frame then paint the wood and MDF white like the trim in the rest of the house.

Before

In progress
This project is a little more involved than I expected but we are making progress.
Jo